

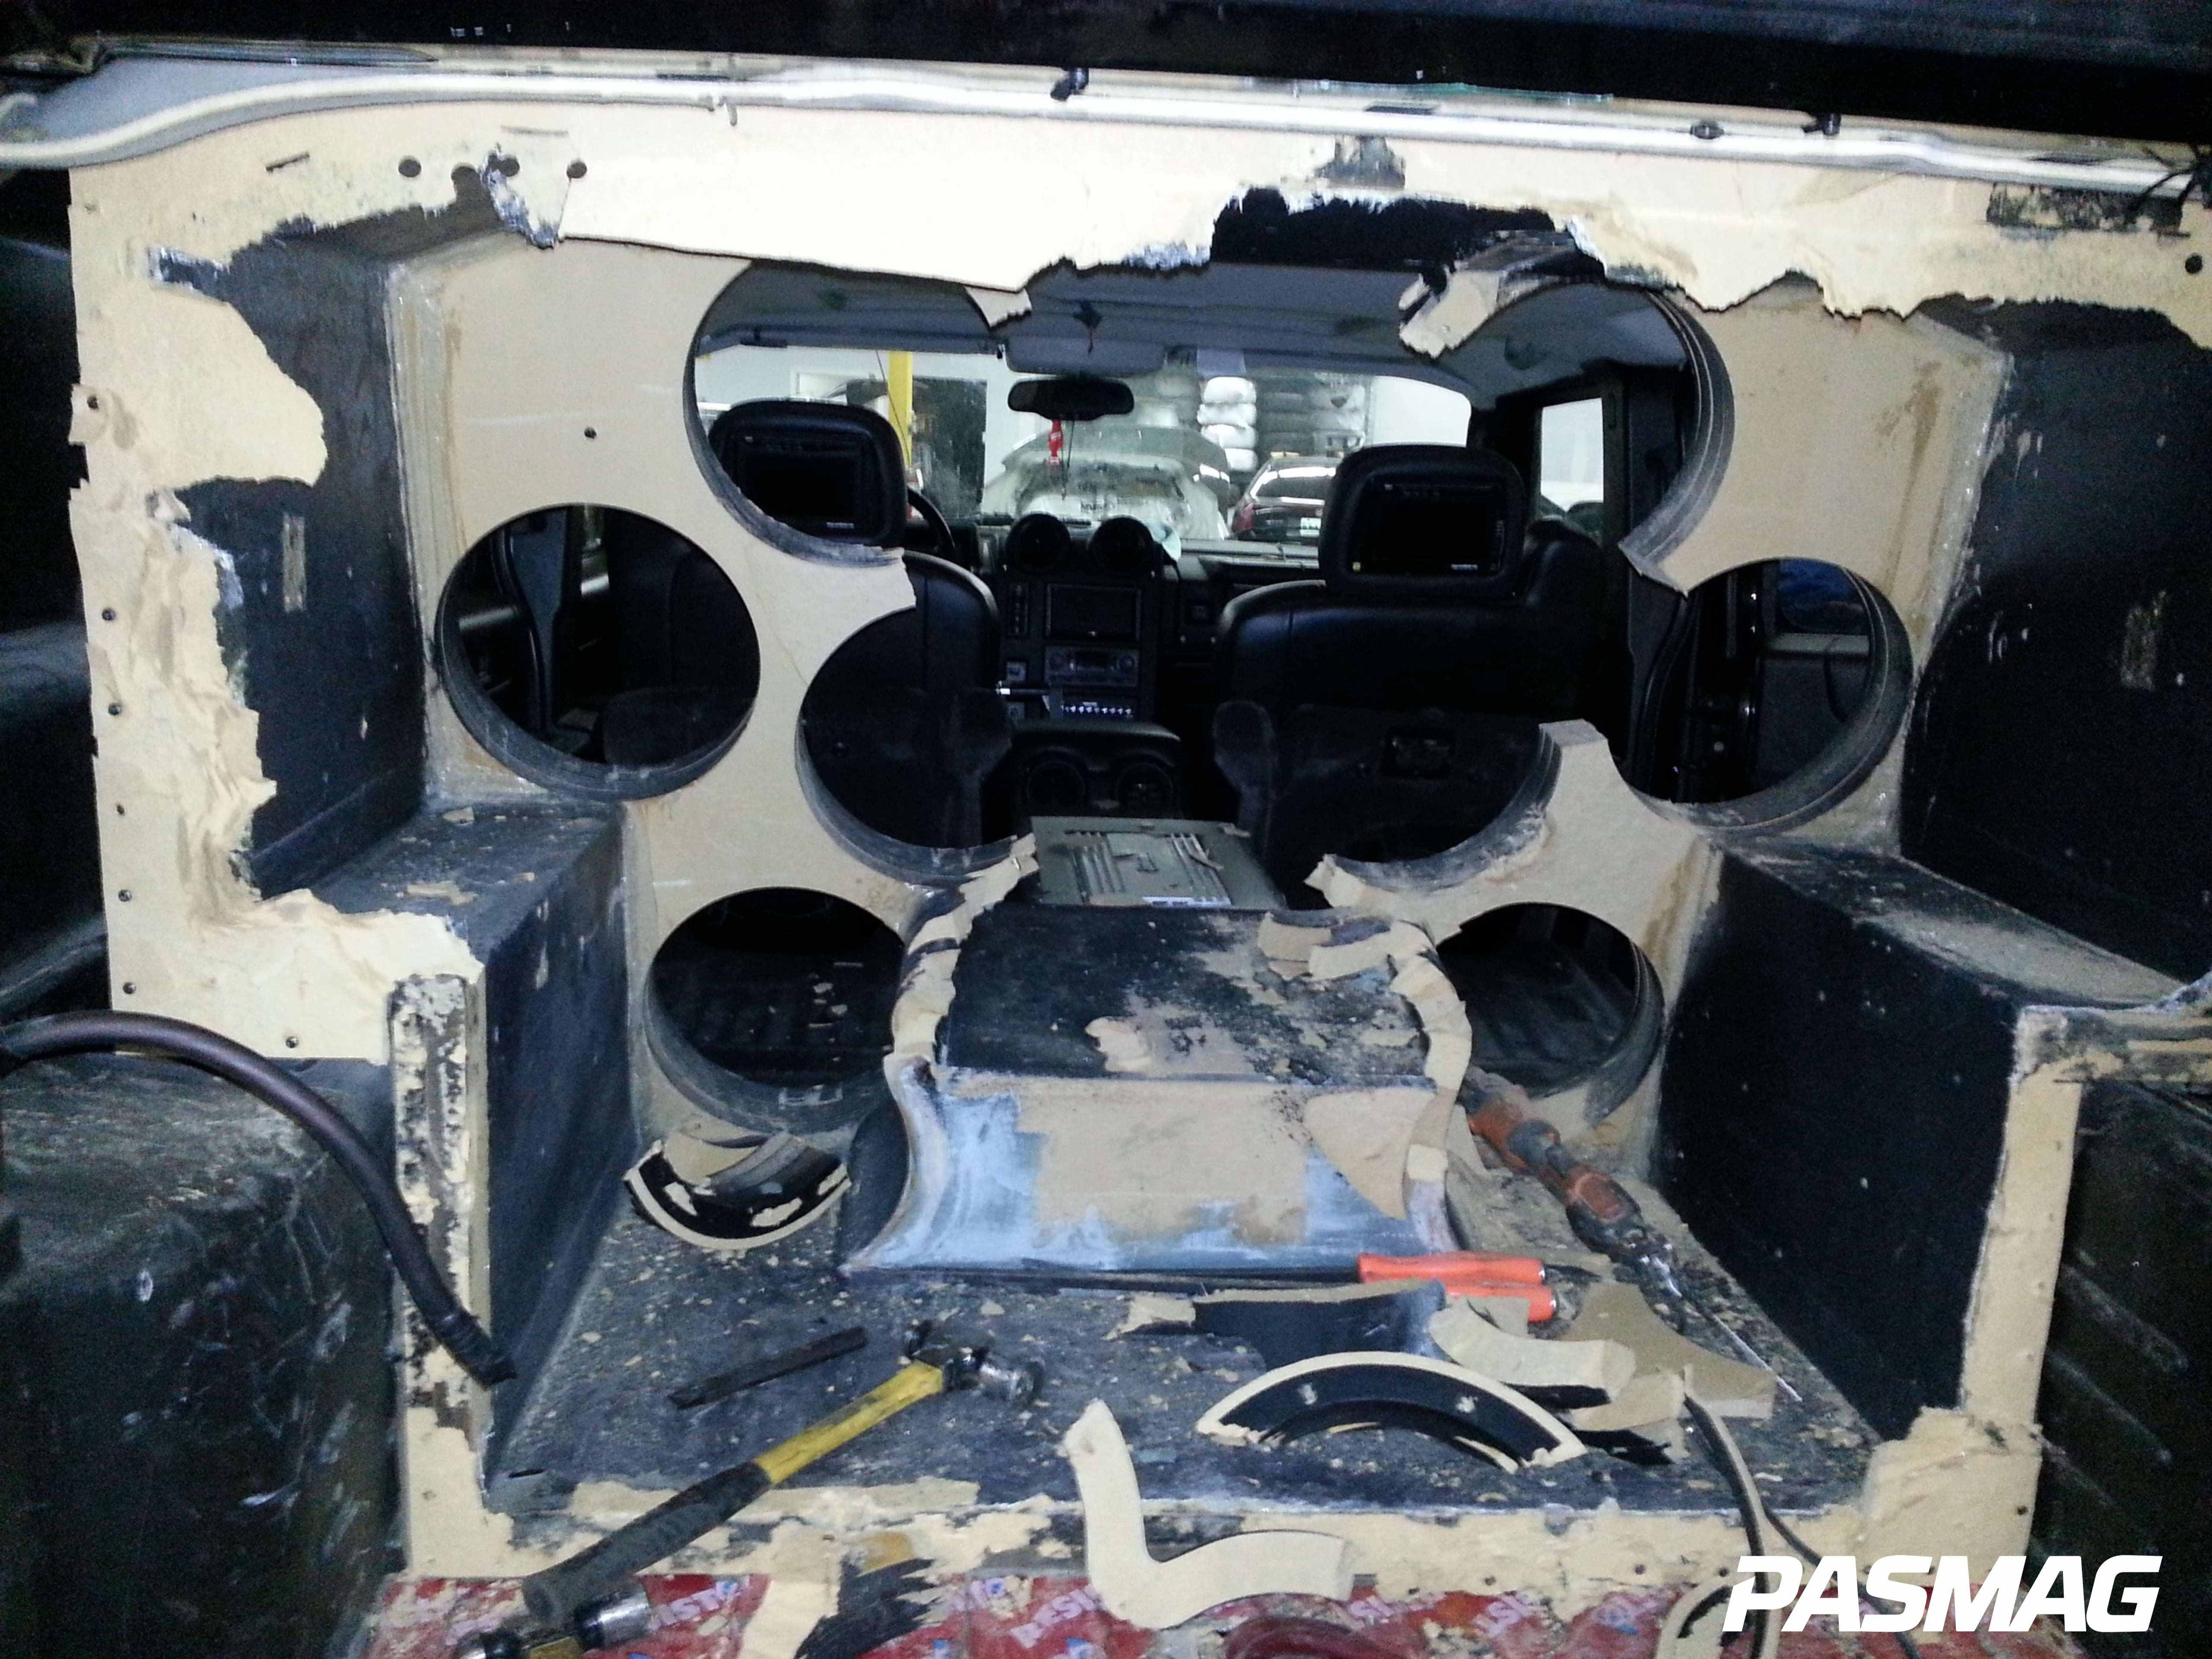
Project Ground Pounder will chronicle the build of this 2005 Hummer H2, nicknamed Brute, from beginning to end. Prior to this project, Brute enjoyed life as a full-blown C-pillar built vehicle with eight 12-inch subwoofers behind the second row of seats that saw the 60/40 bench converted into a pair of buckets seats and custom center console. Powering the system required no less than four 7,500-watt amplifiers on a total of 16 batteries. Of course, keeping up with this took a total of 4,000 watts on a dozen eight-inch midrange speakers with a half-dozen super tweeters to round things out. It was loud – ground-shaking loud! And I’ve been asked many times why it wasn’t enough. People would ask why I wasn’t happy with it. But I was very happy with it and, aesthetically it was perfect. But I just couldn’t shake the tiny voice in my head that kept uttering, “B-pillar, B-pillar.”There’s an old saying that if you’re going to do something, do it right. That being said, Brute has gone under the knife once again! And we are talking a total ground-up overhaul.
Mapping it out
 Once my mind was made up, I sat down with some key people to go over the plan. I first met with my good friend John Wolak, owner of Ultimate Autosports in Stoney Creek, Ontario, Canada, to plan what was in store for this unsuspecting H2. Ultimate had a big hand in Brute’s previous build, so it was a no-brainer they would once again be at the helm of this project.
Wolak and I mapped out the project the way I envisioned it, coming up with a very short list of companies we were going to work with. First on that list is KnuKonceptz to help us address the wiring needs for the vehicle. From its Kolossus OFC wire to its Krystal RCAs, Kno Knoise sound deadener and array of interconnects, KnuKonceptz is a one-stop-shop for professionals and DIYers alike.
Up next were the subwoofers and speakers. A meeting was set up with Core Industries. Core is the Canadian Distributor for a wide variety of 12-volt companies, one of which happens to be RE Audio. Nick Cimino, Core’s National Sales Manager, provided invaluable insight and reaffirmed our decision to use RE Audio for the sub stage, and components for the front stage.
Naturally, in order to power the front and sub stages, one needs an abundance of amplifiers. At the top of the manufacturer pile was one company: American Bass. Having used them numerous times in the past because of unsurpassed service and performance, my decision was easy.
For power and charging, Cimino recommended Ohio Generator, so that’s who we went with. I have used these alternators in the past and had nothing but success with them. As luck would have it, Core also happens to be the Canadian Distributor for Ohio Generator too and, by the end of the meeting, Nick was my new best friend.
That’s enough with the introductions already. Let’s get to the meat and potatoes here.
We’re off to the races!
Disclaimer! What you’re about to see may be disturbing to some people. To others it is just another ordinary day in this glorious hobby we call car audio.
Once I came to terms with what needed to be done and delivered Brute to Ultimate, the tear down began to make way for all things new. Part one of Project Ground Pounder shows the tear down process, including stripping the vehicle to its bare metal shell.
Deadening
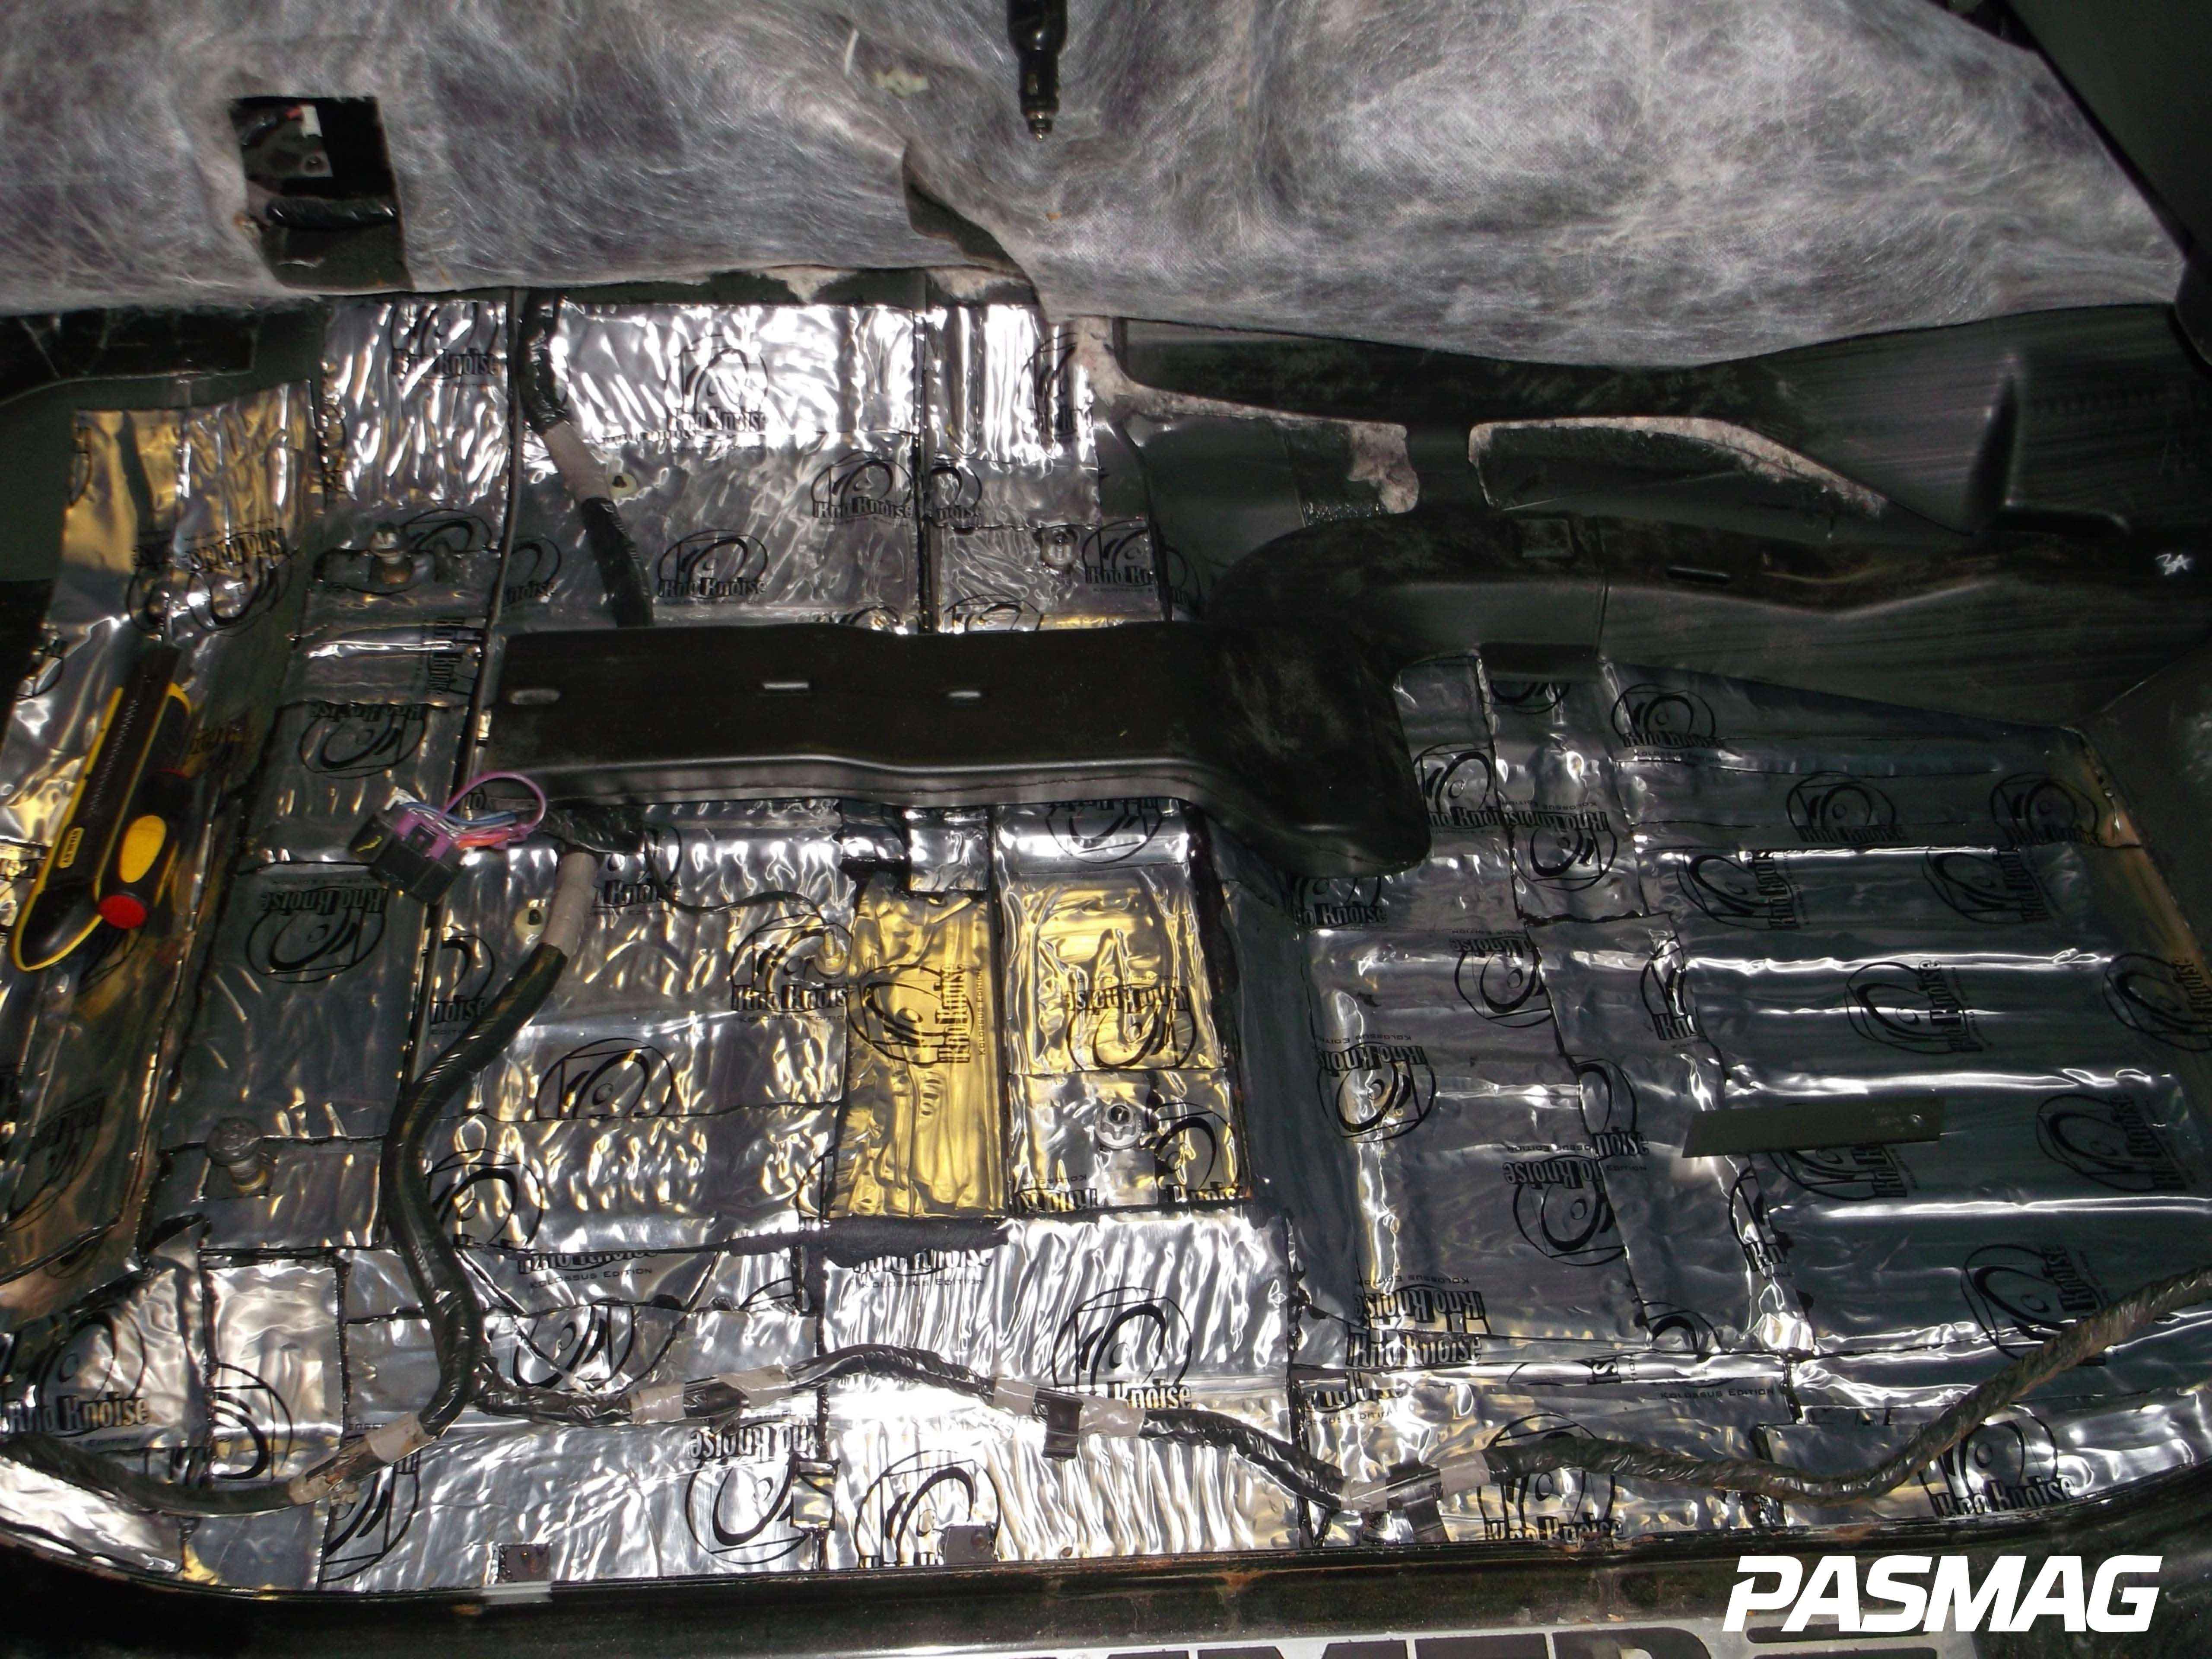
This process alone took more than a week, largely because a full-blown build was already in the shop and had to come out; it was imperative in order to prepare Brute for the sound deadening process. On the advice of Bill and Dan from KnuKonceptz, we used a combination of the 80 mil KnoKnoise Resonance Control and 100 mil Kolossus Edition sound deadener.
 |
 |
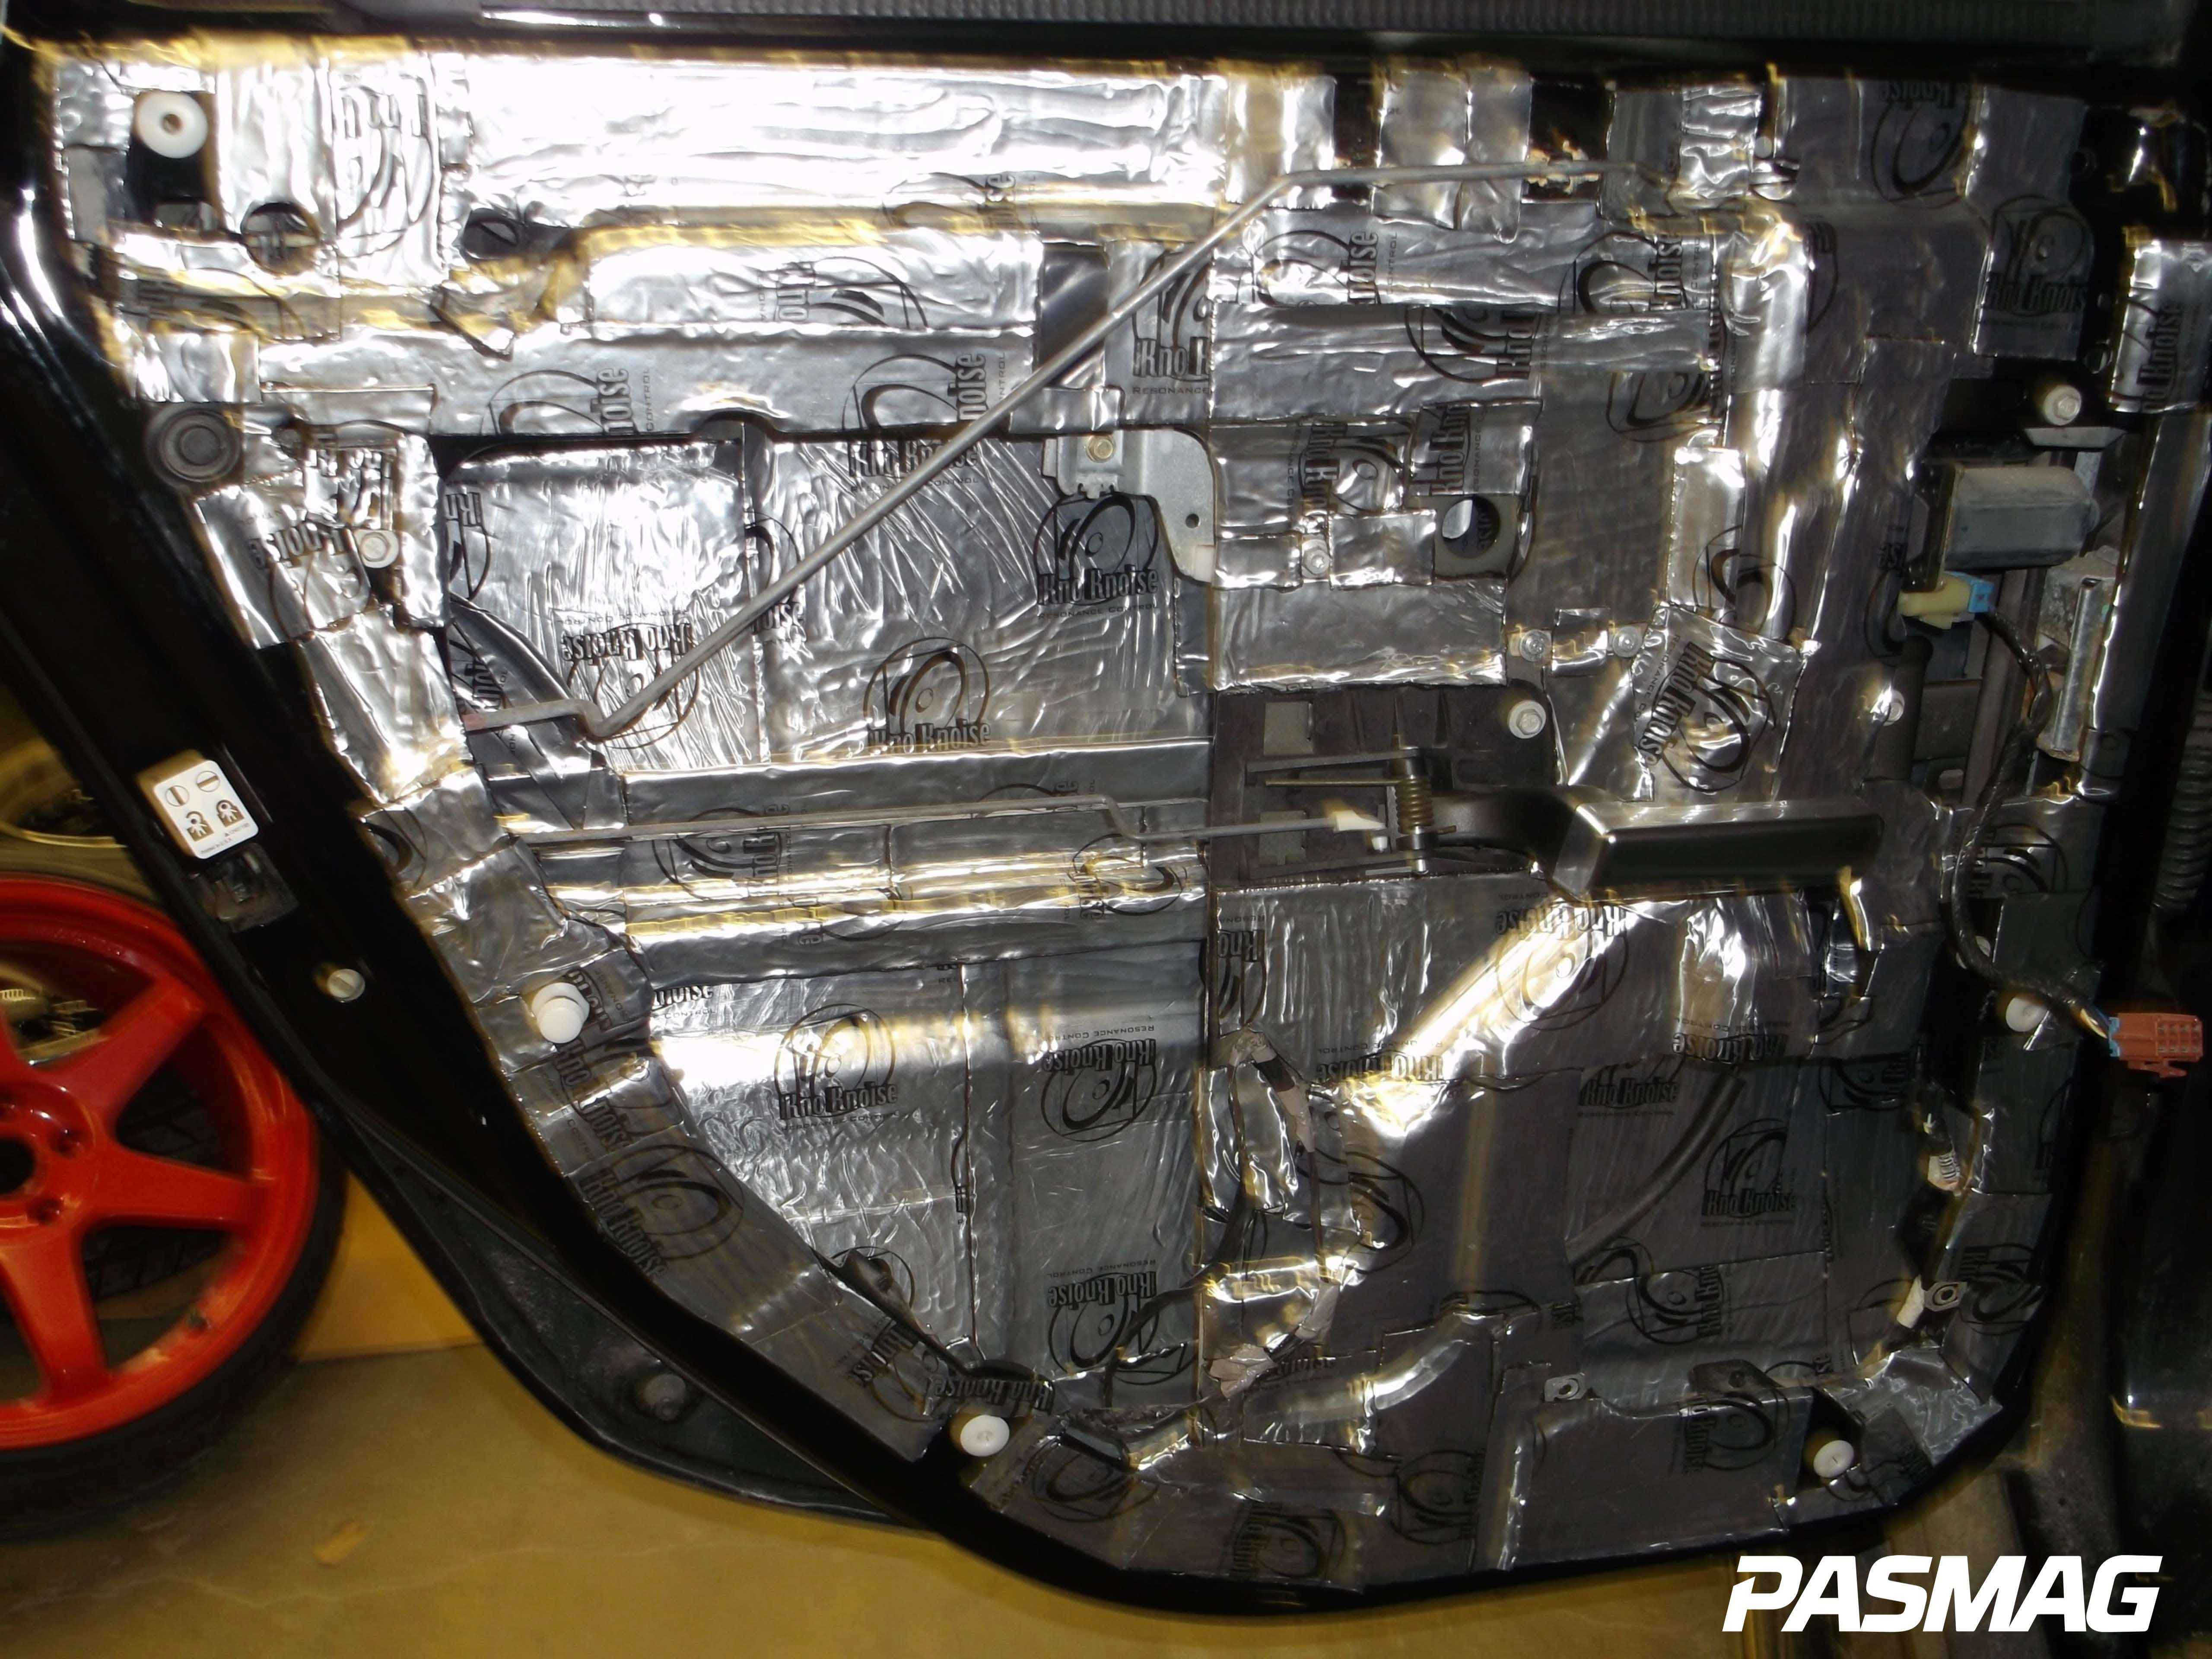
There are four layers in the rear and seven layers up front, with each door receiving a generous helping of the 80 mil Resonance Control deadener. Kno Knoise has to be the easiest deadener I have ever worked with. The butyl is very pliable, doesn’t need to be heated and the foil backing makes it super easy to work with. My door panels went from tin can rattlers to Fort Knox. This will make a substantial impact on the front doors considering the amount of abuse they will endure from all of the pressure generated once the bass starts going. Deadening the door panels also helps with the door panel build that will house the abundance of front stage components. I’m fortunate there are sizable openings in the door panel skins of the H2, which allows for deadener application on the inner portion of the door. Granted, my hands look like they went 10 rounds with a meat grinder when it was all said and done. The pictures don’t do it justice.
Once the door panel deadening is complete, the focus shifts to the floor of the passenger cabin. Most people don’t realize how much abuse the floor of a vehicle undergoes. I have seen firsthand metal tear from excessive wear and flexing caused by low frequency bass music. Since I don’t want to be pulling a Fred Flintstone in the foreseeable future, a healthy application of the 100 mil Kolossus Edition deadener on the floor from the B-pillar all the way forward and under the dash will ensure that. A total of four layers have been applied to the entire floor to aid in the elimination of flex.
Moving to the roof and rear compartment. The former will be deadened once the sunroof has been sealed. In order to seal off a B-pillar wall properly, this must be done, although it isn’t possible because of the sunroof and tracks on the inside of the roof. So, the entire sunroof assembly and tracks will be removed, and I will weld a new bracket to house the sunroof that will be sealed indefinitely. A substantial amount of deadener will be applied to the roof at that time. The rear compartment will also receive a helping of deadener once the battery rack has been built.
Wiring
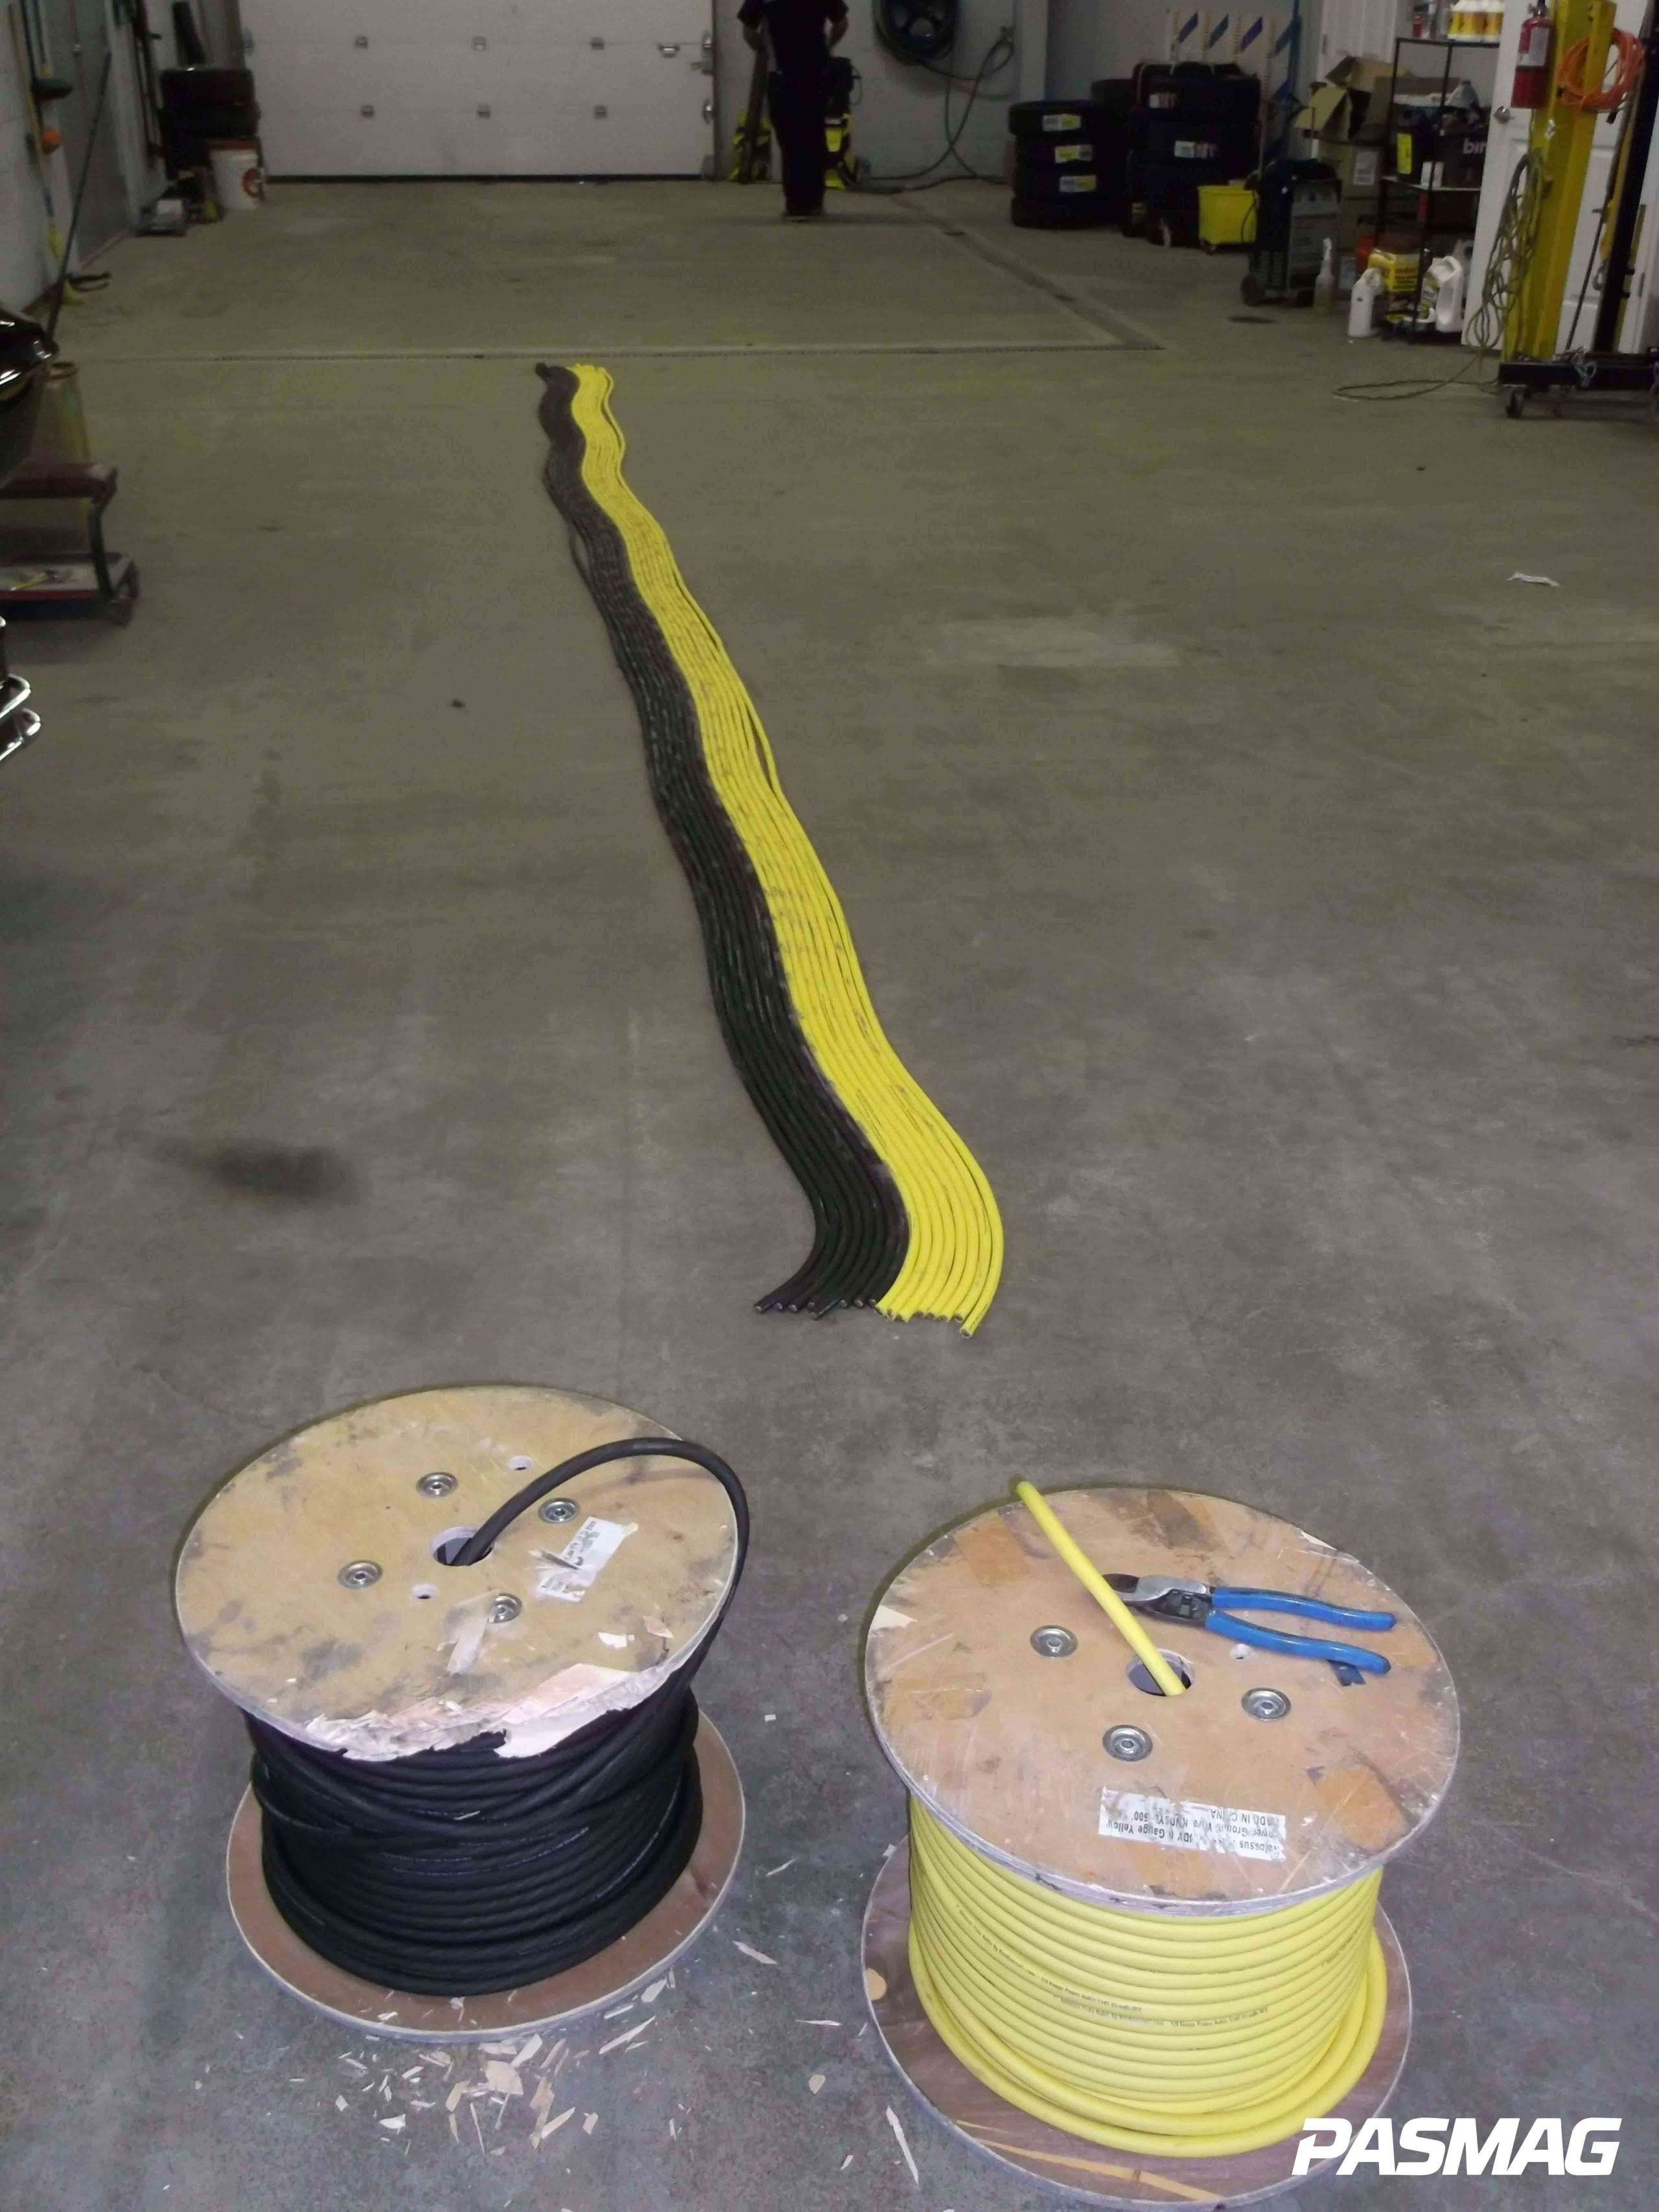 Next is the installation of the charging wires, which run from the alternators up front to the battery bank in the rear. The wire of choice for this install is the KnuKonceptz OFC Kolossus FLEKS 1/0 wire. I opted for black for the ground wire, and the Kandy Kable Yellow for the power runs. (I’ve worked with tons of wire over the years and have to give it to KNU, this is top tier stuff! Besides the very workable housing jacket, the wire is tinned ofc, which provides unparalleled current flow.)
Now for the fun part: having to cut the wire, run it and maneuver the spools. For those of you doing double and triple takes, your eyes are not deceiving you. Those rolls are 500-feet long apiece! I offered a reward of $1,000 to anyone who was able to pick up each roll unassisted and carry it around the shop. When that failed I was relegated to rolling it around. Once the spools were in position, the cutting commenced. One run, two runs, three runs, four runs, five runs, all the way to eight runs of power and eight runs of ground. That works out to 200 feet of power and 200 feet of ground for the alternator charging wire up front.
Typically, when you run power and ground wire you do so through the vehicle, under the carpet, and into the back. This is not the case with 16 runs of 1/0 cable. The wires begin under the hood. The eight runs of power wire run from the alternator-fused bracket and down the firewall along the inner driver’s side frame rail. Using a screw-in and insulated metal tie-down, we make sure to secure the power wire to the inner frame rail. All remaining runs of wire are attached to each other using zip ties, running down along the inner frame rail to the rear of the truck. Of paramount importance is making sure to avoid any sharp edges and the exhaust system. Once in the rear, the wire runs into the rear cargo compartment through 4x4-inch holes protected by rubber sleeves which are cut into rear floor cargo area. The same steps have been taken for the ground runs of wire on the passenger side.
Quad Alternators
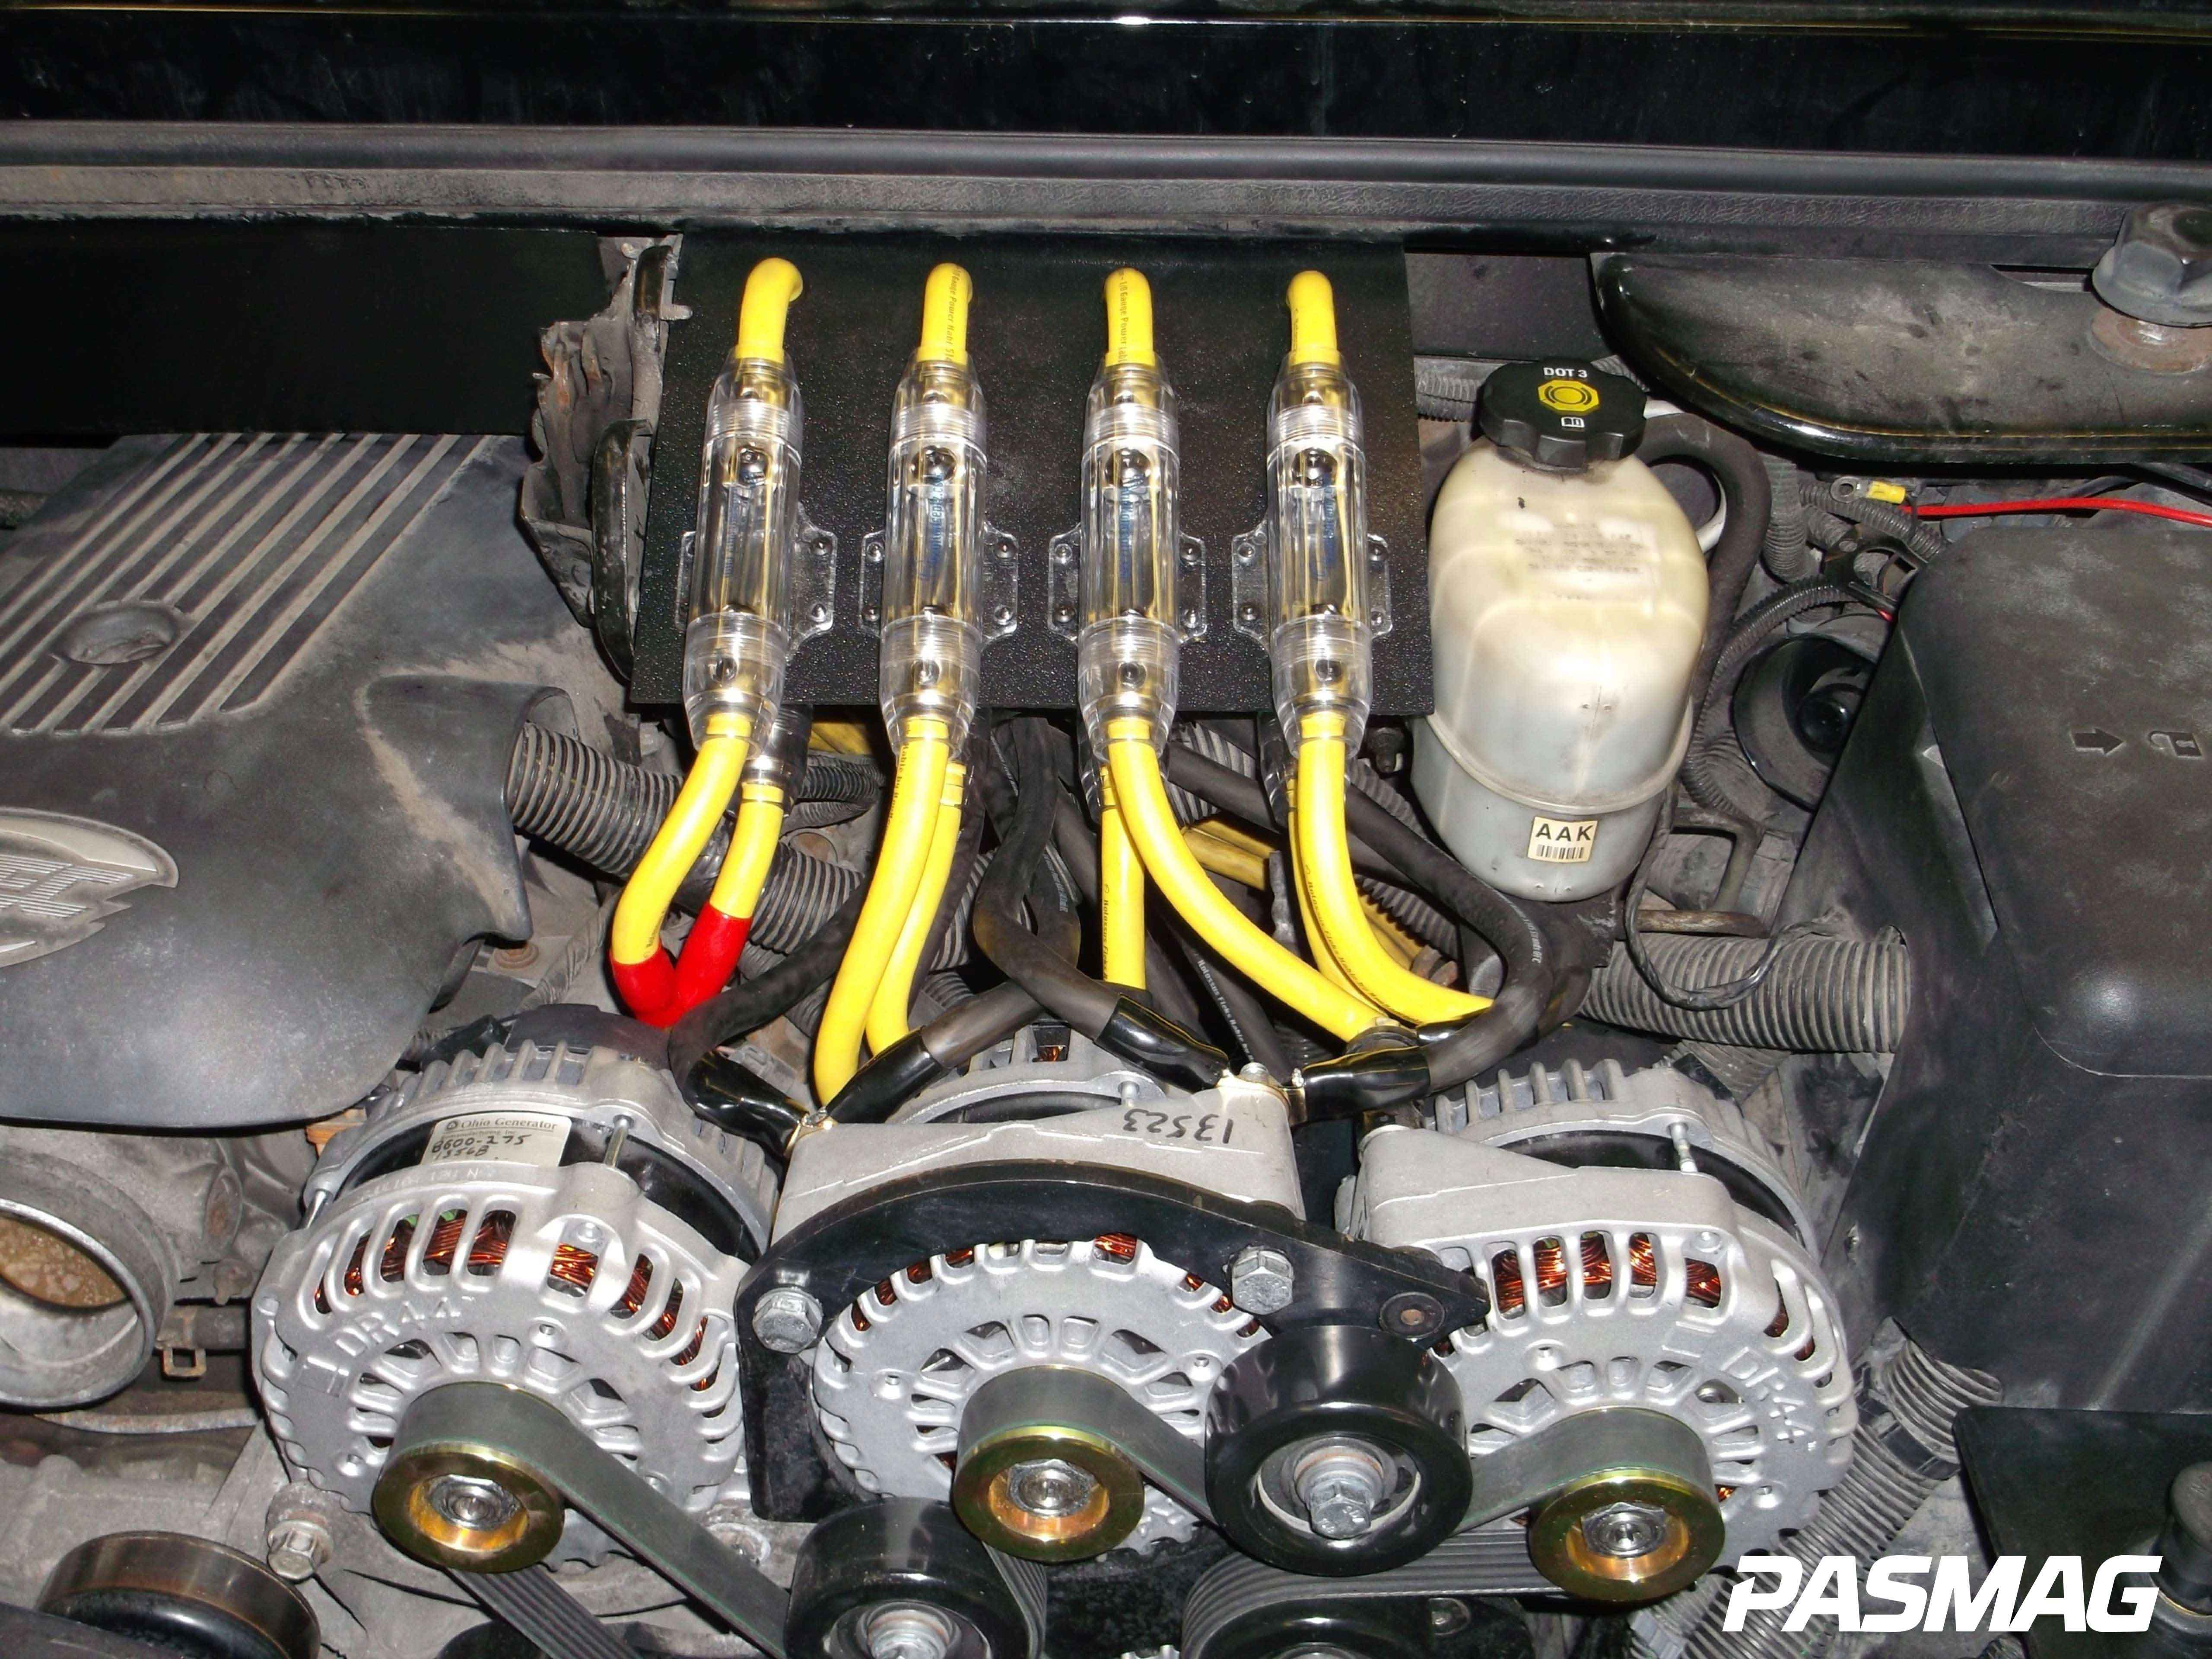
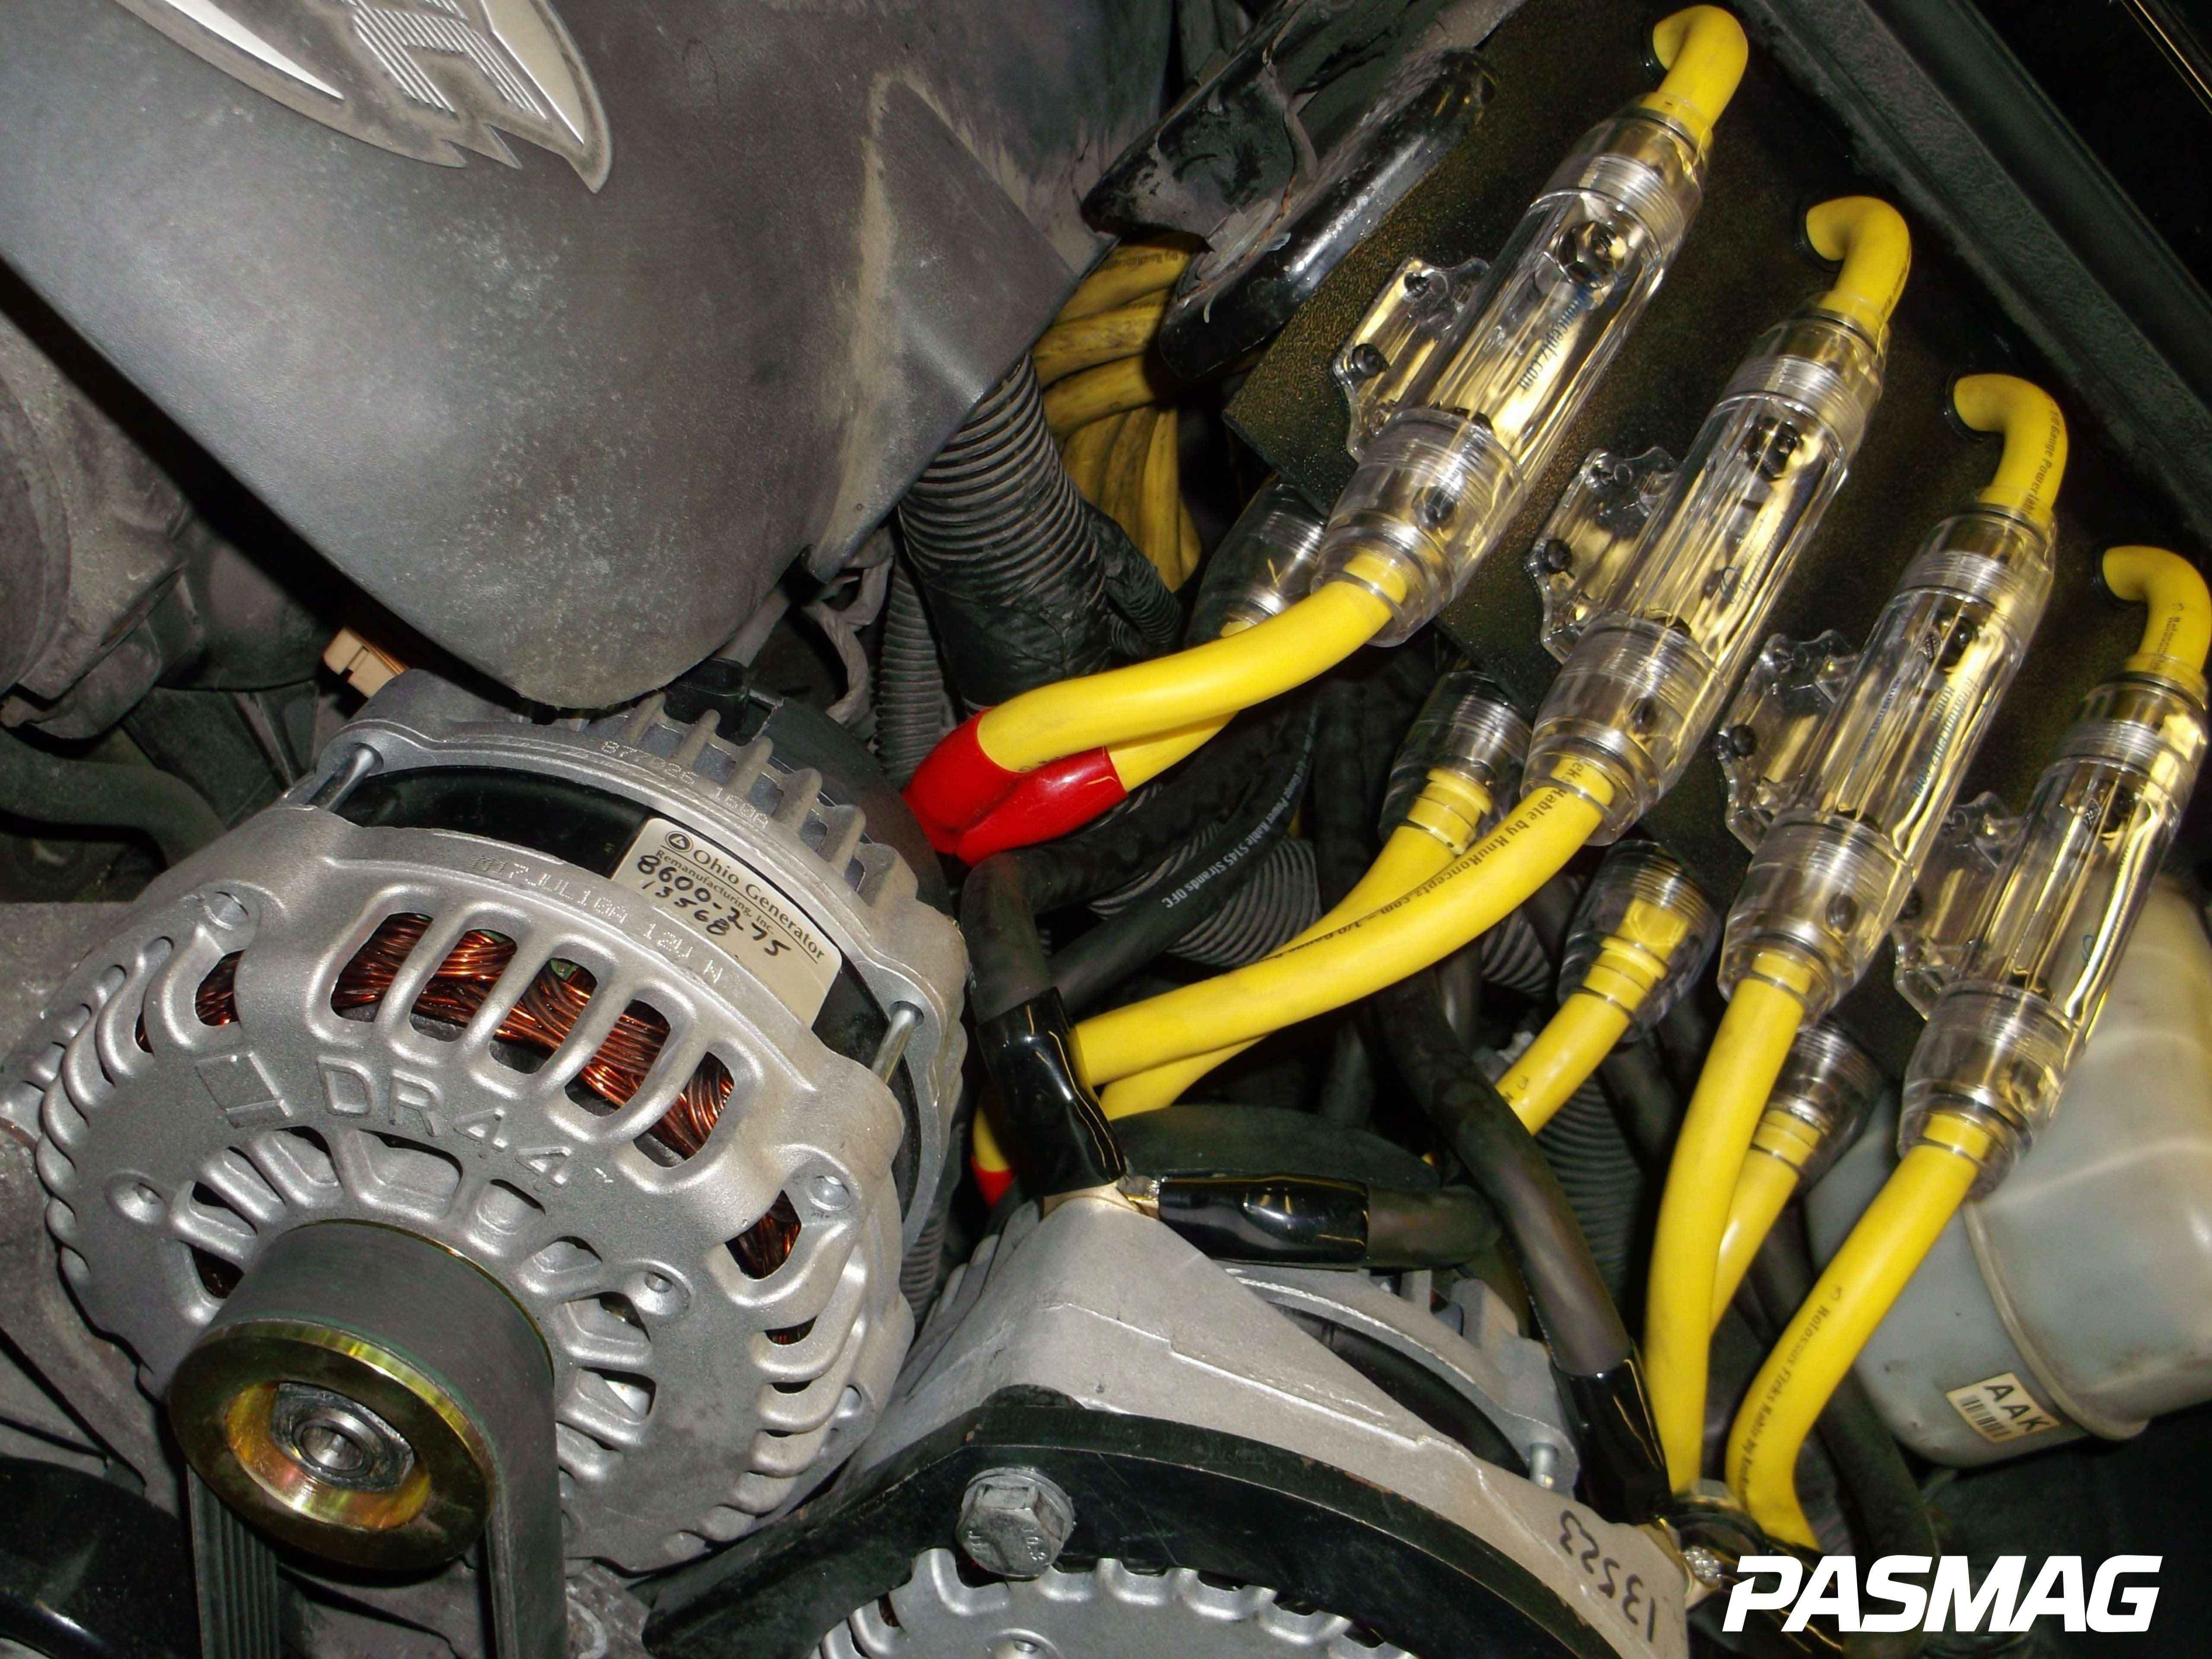
With all the charging wire running from front to back, it’s time to move under the hood and perform more surgery with four 300-amp Ohio Generator DR44 alternators. There is nothing like having 1,200 amps of charging current at your disposal. Hats off to Tom Eliopoulos at Ohio Generator for providing such sweet alternators!
The first step is to remove the air intake tube while releasing tension on the belt and subsequently removing the belt. From there, the factory alternator is removed along with the lower idler bolts. With the space freed up, it’s time to install the custom quad alternator bracket. The first step is installing the front section of the bracket using longer bolts through the factory idler housing. The rear section of the bracket is then installed with the supplied spacers and bolts. Another important thing to account for is the relocation of the ECU and battery under the hood. The H2’s original ECU location is where the furthest right alternator will sit, so it needed to be repositioned about six inches lower and tucked away. The battery has also been relocated to the rear and tied in to the battery bank. To accommodate this, relocation wire runs to the rear and a positive and negative charging post is incorporated in to an ABS plastic platform, which will house a voltage gauge as well.
When it comes time to install the alternators, the first one to go in is the bottom alternator. After bolting it on, it is checked to make sure it is correctly clocked. We move in a counter-clockwise direction bolting on the second, third and fourth, leaving the final alternator loose for the time being. From here the remaining idler pulleys are mounted on to the bracket and the new belt is routed. The fourth and final alternator (which is in the stock alternator housing position) requires the bolt be removed to drop it one-half inch and allow for the belt installation. Once this is done, the tension being applied to the factory tensioner can be released in order to finish wrapping the belt around the fourth alternator. With that done, the bolt for the fourth alternator can be installed and secured.
 |
 |
With all of the alternators installed, it’s time to check the belt alignment on all pulleys and idlers. This is done by starting the vehicle and making sure the belt does not rub, and letting it idle for only a few minutes as it is running on battery power.
The final piece of the puzzle is the ABS bracket, which houses the KnuKonceptz in-line ANL fuse holders. Using 1/8-inch ABS plastic, we cut it to size (12x10 inches) and give it a slight 25-degree bend. Four waterproof ANL fuse holders are mounted on top with four matching ones underneath, each with a 300-amp ANL fuse (of course, the fuse has not been installed as of yet). All wires are terminated with crimped-on 0 AWG ring terminals with two runs of 0 AWG power and ground per alternator.
Phase one of Project Ground Pounder is now complete. Be sure to read the full version online and stay tuned for the second phase in the next issue of PASMAG.
PHASE ONE ESSENTIALS
- Custom quad alternator brackets and hardware
- Ohio Generator 300-Amp alternators (x4)
- 135 sq-ft of KnuKonceptz KnoKnoise 80 mil Resonance Control sound deadener
- 100 sq-ft of KnuKonceptz KnoKnoise 100 mil Kolossus Edition sound deadener
- 200 ft of KnuKonceptz Kolossus Fleks Kable Black 1/0
- 200 ft of KnuKonceptz Kolossus Kandy Yellow 1/0
- KnuKonceptz in-line waterproof ANL fuse holders (x8)
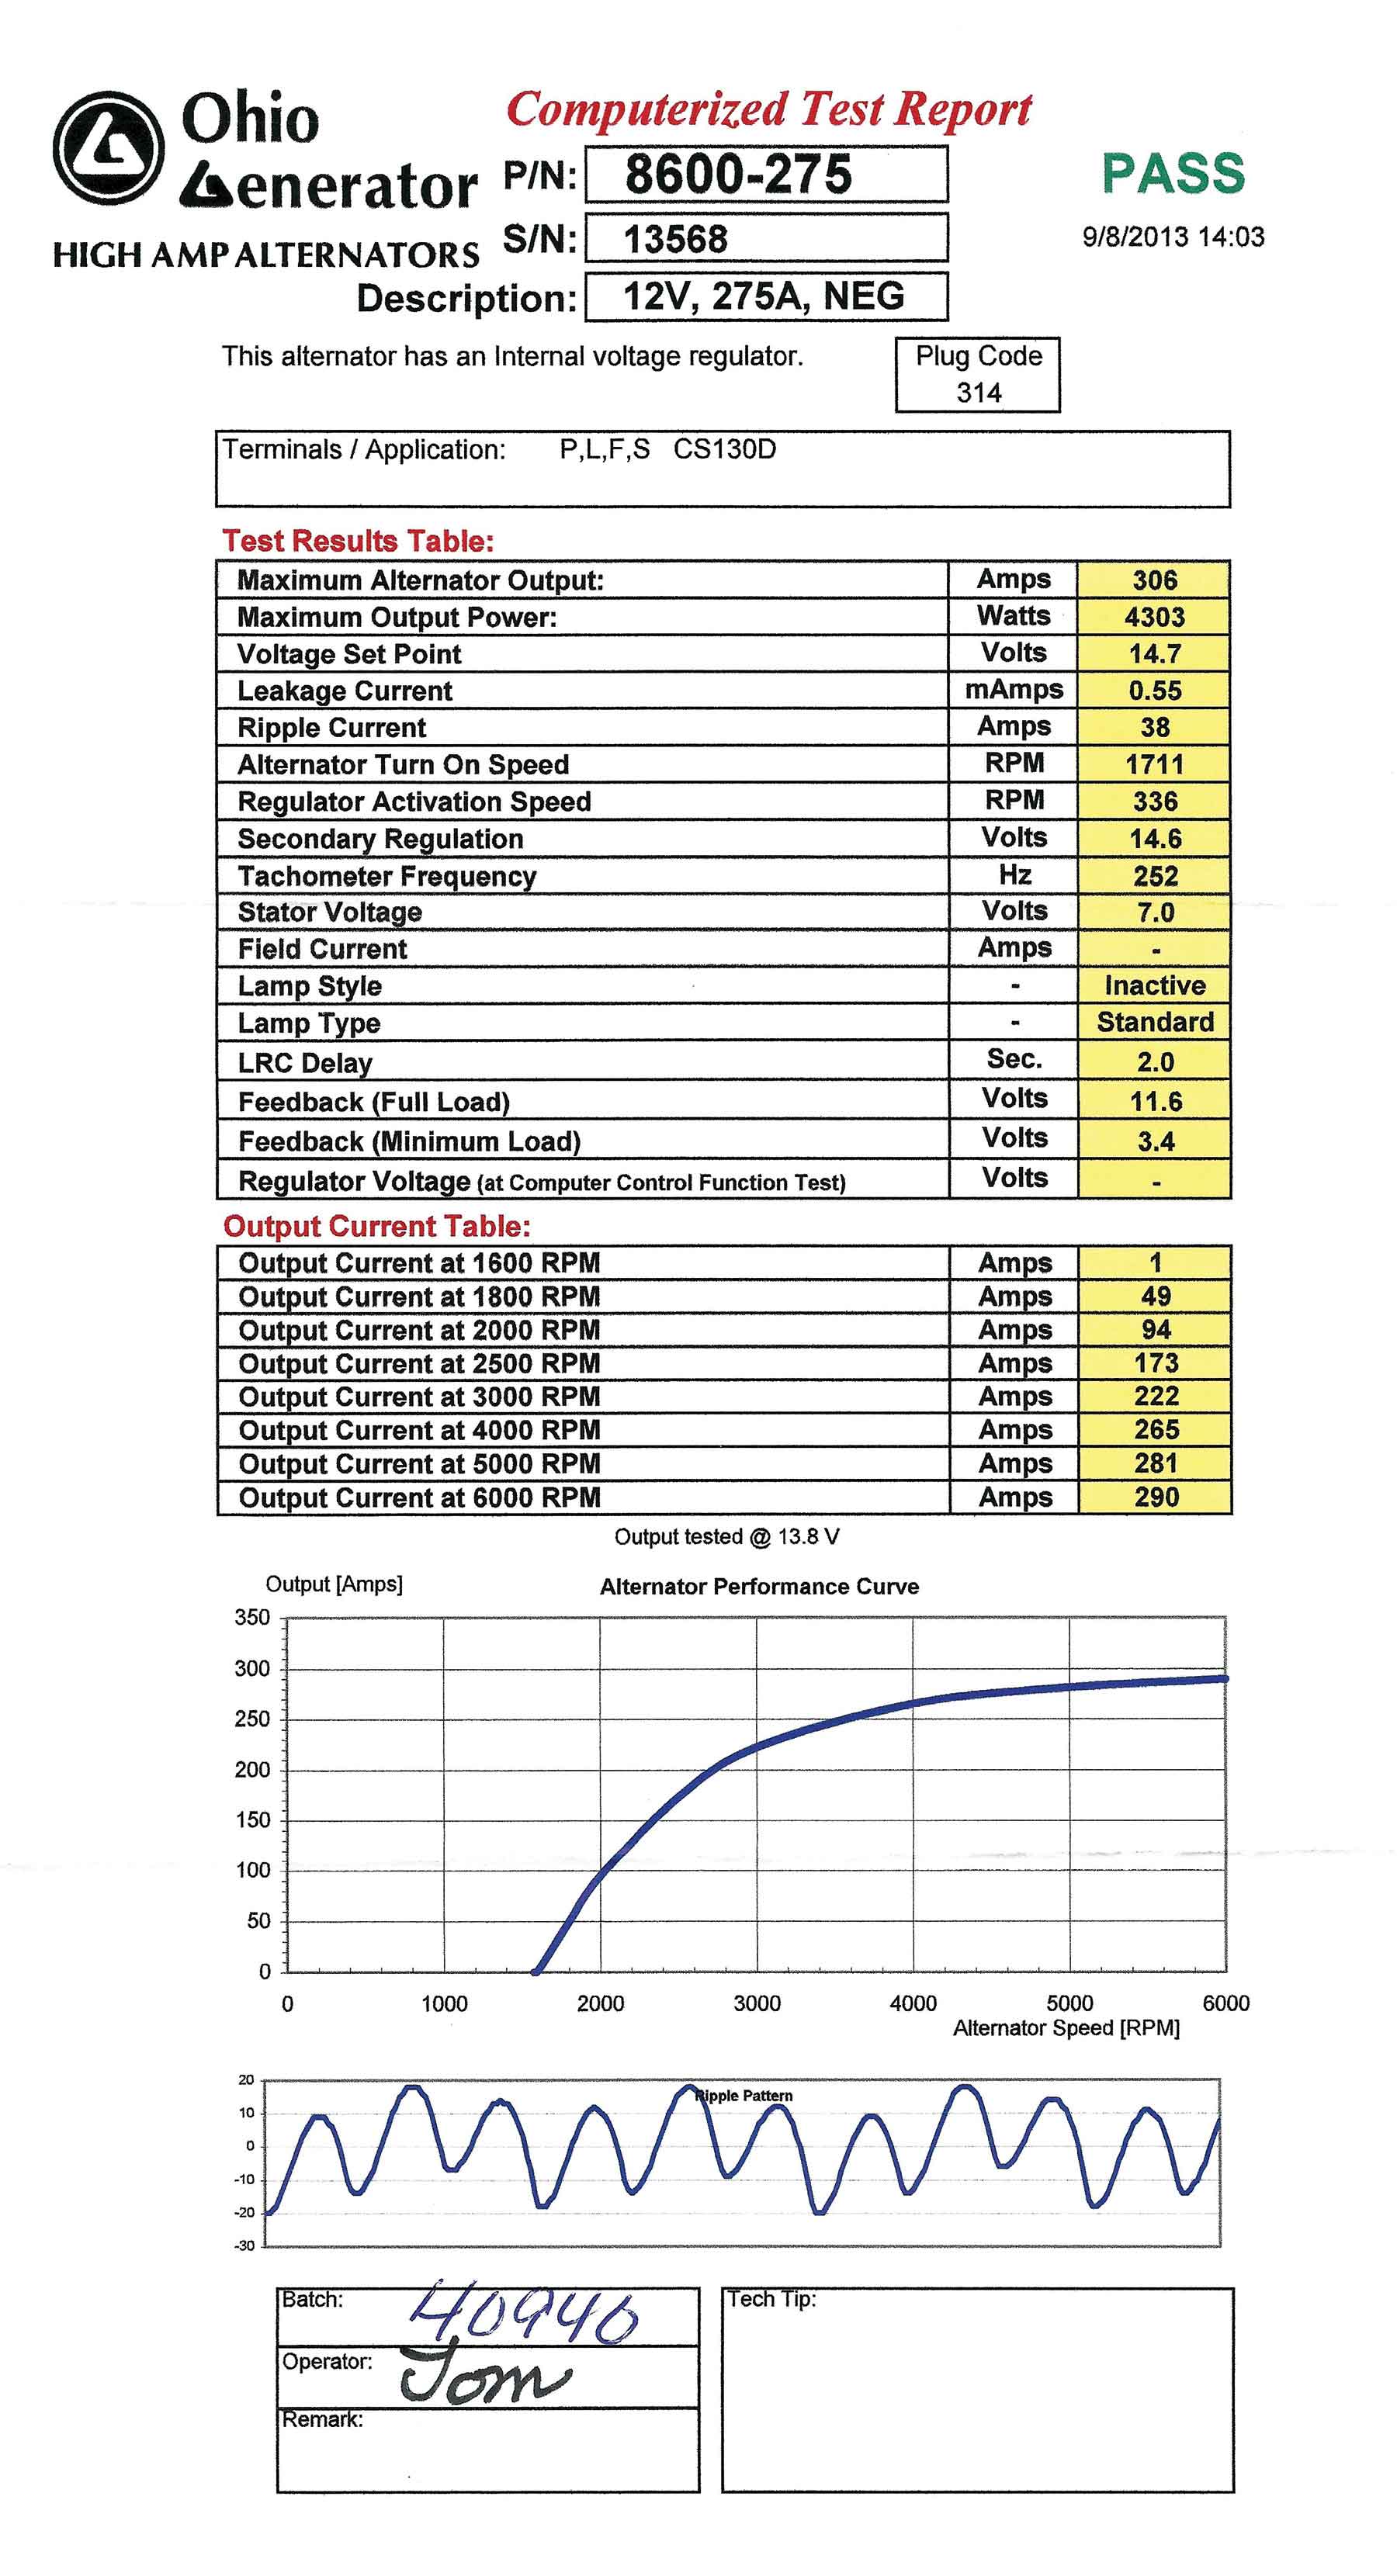
ALTERNATOR DYNO
SOURCES
Ultimate Autosports – www.ultimateautosports.ca – 905-385-8446
KnuKonceptz – www.knukonceptz.com – 216-310-6555
Ohio Generator – www.ohiogen.com – 330-875-6677
Core Distribution – www.coreind.ca – 905-570-8613
Also see:
Project Ground Pounder: Phase 2
Project Ground Pounder: Phase 3
Project Ground Pounder: Phase 4
Project Ground Pounder: Phase 5